For Bridget: and anyone else: this is my very first tutorial, so please be patient. I made a smaller version of my
picnic blanket the other day. It is supposed to be an activity mat for doing school work on the floor. I figured I would take some pictures and *try* and explain the project for anyone wanting to make one. There are 2 things that are very important to making this: 1. You must be able to sew a straight line (as the patchwork probably won't work otherwise) and 2. you must be able to safely iron: enjoying ironing is an excellent bonus and will take you far in the quilting world. ;)
 Materials:
 Fabric for patchwork on top. I used 3 yards of 1/4 yard squares for my picnic quilt, and scraps totalling around 1 1/4 yard for the activity mat.
Old or
thrifted sheet for bottom
Scissors, Needle, thread and sewing machine
 Step 1:
 Cut your fabric into desired size squares. I cut 12- 1/4 yard squares for my picnic blanket and I cut scraps into 3 columns of the same width for this smaller mat. Then lay your sheet down, and lay your squares on top in the order you wish to sew them. This will give you a rough idea of how it will look.
 Step 2:
 Sew the columns (or rows if you desire) of squares together as straight as possible. I didn't pin them, but I am brave like that. So pin the squares together if it helps. ;)
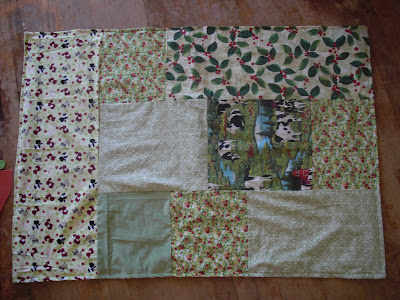
Step 3: Iron the columns. Line them up (as in picture above). If you have same-sized squares it is important to line up the squares in the middle of the column. Once you have them where you like, place one column on top of the other RIGHT SIDES TOGETHER. That means, make sure the backs of the fabric are facing out. And pin them together starting in the middle and working your way down. I pinned the first two columns, sewed them together and then pinned the last column in the same manner (starting from the middle with right sides together) and sewed it.
Step 4: Iron the entire patchwork- right side up.
Step 5: Lay the patchwork on top of sheet (iron sheet if necessary) RIGHT SIDES TOGETHER and start pinning!! I pinned about every 4-5 inches, starting at the top of the quilt, working around the edges and through the middle. Pin in between the squares, and on the squares... pin everywhere!!! I know it is a pain, but this will keep the patchwork and the sheet even and together while you sew.
Step 6: Sew around the outside of the entire quilt, LEAVING A 5 inch OPENING along one edge of the quilt for turning right-side out. Remove the pins that you placed along the edge as you go.
Step 7: Remove all pins (I forgot this step and it was very pokey!!!)
Step 8: Pull entire quilt through your 5 inch opening.
Step 9: Sew along the outside of the entire quilt, starting at the opening you left. Feel free to iron it flat before doing so, as it will probably make it easier. Don't worry too much if it isn't perfect... NO ONE WILL NOTICE. Unless of course, they have no life. And it should look something like this:

Or this:
 Step 10:
 Go have a picnic!!! :)
 I finally finished Isabel's blanket. It only took 2 late nights, after having squares cut for months! I bought a really nice soft blanket at TJ Maxx for the backing. I was going to put some satin trim around the outside, but didn't like the blue I picked... or how thick it was. I might just leave it as is, following the same directions as my previous quilts. It puckered a bit where I hand sewed it closed and I didn't do any real quilting because I like the airyness of it. I will probably add some ties.
 Isabel is definately very sensative to textiles, and much more of a blanket person than Anastasia. I made so many things (including 2 blankets) for Anastasia before she was born and other people made her blankets. She ended up falling in love with one of Nick's old handmade quilts from when he was a child. Isabel has a little lavender fleece throw she likes, so I am secretly hoping that she will attach herself to her very own (and possibly first non-hand-me-down) handmade blanket. She loves rubbing the edge of soft blankets as she nurses to sleep.
 And it looked so nice draped over this chair... which in and of itself is another craft project. There is a tiny bit of orange in one of the fabrics, and it looks really nice with this orange pillow... so I am thinking orange satin trim would be nice, only 1/2 inch thick. Has anyone made bias binding with satin? Or using satin trim? It looks nice now... but I really want a little bit of trim.
 So on Sunday morning, (yesterday) Anastasia and Isabel were out of their beds before us, and Anastasia came into our room and asked, "Mommy, can you wash the chocolate off of Isabel's face?" The worst of things went through my mind. Thankfully, Anastasia had opened the fridge and helped herself and Isabel to breakfast from my bag of chocolate non-perils. This is what we found:
 And we laughed about it a good long while, and then I took some pictures and I eventually changed and bathed her. AND I was glad I only paid $1 for those pjs at the thrift store... but then I was even happier that oxi-clean took every last bit of chocolate out of them!! Seriously, what did people do before oxi-clean? And onto the "car-cart" at the grocery store. We love these things:


 I am so glad we finally have a clean house (for a matter of minutes) and I spent less money than usual on groceries. And


