Showing posts with label school. Show all posts

Thursday, August 2, 2012

Homeschooling

 Had you asked me 3 months ago about homeschooling, I would have told you I had no idea what I was doing and probably told you how badly I wanted to send my children off to school like every sane person on the planet. But we had made the decision long ago to home school and that is what we are doing.  Thankfully, the past few weeks I have felt a renewed sense of peace and passion on the subject as we plan and piece together all the particulars and start a new season of learning.  A little over a week ago, I stumbled upon this video that really sums up a lot of my attitude towards education:

(Sorry it is off center)
I find it is so important to educate the whole person. Mind, body and soul.  And that the most important things we learn, we learn through creativity and using our imagination.  As Albert Einstein mentions,

“If you want your children to be intelligent, read them fairy tales.
If you want them to be more intelligent, read them more fairy tales.”
― Albert Einstein

So all those things considered, we begin our adventure into education at home.  


I have taken a Waldorf approach to homeschooling with a good amount of Charlotte Mason's concepts mixed in. I also like a lot of Montessori ideas, especially the introduction to reading and spelling. I love the beauty, simplicity and pure imagination of the Waldorf Concept. I like how every subject is presented in stories. Handiwork, art and movement are considered as important as the intellectual subjects. The approach focuses on the whole person and rhythms of life. I am also drawn to the importance of spirituality and nature to the education of the soul.  We are so fortunate to live in a mecca of natural beauty, and it is absolutely important to me that my children have a deep love and a healthy relationship to God's creation. I love the overall picture, but I am not a Waldorf purist but think than any educator can really gain so much from adding some of the concepts to their lives. I like Charlotte Mason's ideas to keep a nature journal, read "living books", encourage good habits and again, art and handiwork.  I also like her classical studies, and some of her approaches to different subjects.  Like all theories of learning, not one is perfect but so much can be gleamed from each concept to fit your children, life and style of learning.


For curriculum I chose the Kindergarten curriculum from the BEarth institute.  The curriculum is mainly stories, wonderful stories, songs, and crafts.  We started doing a little "Science" yesterday and the curriculum uses the Storybook of Science (that you can download free here!)  and the first story was about poisonous berries and plants.  We learned so many plants in our yard are toxic and the kids were completely glued to my total surprise! Anyway, I have been using Simply Charlotte Mason as a guide for adding things like music, art, Bible and poetry.  We will be studying one composer a month and one artist.  For History we are just reading chapter books.  We will be finishing up "Little House On the Prairie"  this month and begin studying Native Americans through stories.  I would love to rhythmically go through American History from Indians to present day every 2 years so the children almost get a timeline in their heads.  I also am not sure where to fit in world geography/history.  But I am not worrying about it for Kindergarten...... I just need to see if I can get through this year!  Not to mention ballet and Girl Scouts. We will have a full plate! :) 

I am so excited though, and truly blessed to be on this crazy, beautiful journey of homeschooling. I can't wait!

Tuesday, September 13, 2011

Apples and Cinnamon Play dough

I haven't made play dough in a while. My kids weren't THAT into it last time, but to go along with fall, and apples, and cinnamon and pies, I made apple play dough and cinnamon play dough. I added rollers, pie pan, toothpicks, little butter knives and leaves to make apples: And everything stores nicely in a basket on the table ready for open-ended play. It was a HUGE hit. Almost as huge of a hit as washing dishes in the sink. But not quite.


I used the basic recipe from Playdough.org and divided the dry ingredients in half. For half I added about 2 tsps of cinnamon and then water to cook. For the other half I used steeped Celestial Seasonings Cranberry-apple tea in place of the water. I am unsure how well it will last, but I am storing them in jam jars with lids. I will let you know if it goes bad. I like the recipe overall because it is less greasy than others. My little mad scientist Isabel thought it would be fun to see what adding water would do to playdough while I was on the phone. It made slime. BUT I added a handful of flour and kneaded it in and it saved the day! Good as new aside from the colors being mixed together now. ha.


We had fun using toothpicks as Hedgehog quills, and they also make great candles for birthday cakes and pies. Sometimes its amazing what will work as playdough toys when you don't have a box of store-bought ones! Let the fall smelling molding and making begin!

Monday, September 12, 2011

H is for...

So I decided now that we are back from our vacation, to get to work on "schooling" the kids, or unschooling, or homeschooling, or whatever you call it when you sing songs, play games, make cookies and have fun in some kind of organized fashion. It feels very official with new backpacks, notebooks and crayons for sure. And their rain boots just kill me. We are still plugging away with letter themes. Maybe by the time they are 18 we will be on the letter Z. I am not using any curriculum whole heatedly, or any particular philosophy as my singular guide. I like aspects of Montessori and Waldorf pedagogy and yet I like the organization of a more traditional education. I want to teach my children to read as early as they show interest so that is our area of focus with Anastasia at least, and we are working through "Teach Your Child to Read in 100 Easy Lessons" which is working beautifully for Anastasia. It is short, I skip through a good bunch of the exercises that bore Anastasia, and hopefully by Christmas she will be reading. But if she isn't I am not going to freak out about it. I think that is why I am homeschooling. So my children don't have to fit into any mold, especially a government-run mold. That being said, homeschooling isn't for everyone, and that is fine too. I secretly wish my inner convictions granted me the freedom to send my kids away for 8 hours a day aboard that big yellow bus. That bus always seems to drive by my house when my kids are fussing and fighting, taunting me in that obnoxious yellow sort-of way. Imagine sending my kids off and knitting all day. But instead I make little boxes of sensory exploration:
This is our Apple Orchard Sensory Tray. We are learning the letter "H" this week, which is why there are Horses in it. Also included are apples (plastic and wooden), pails, baskets, Spanish moss from the $store, various wooden trees, scoops, pie tin, pom poms galore, blocks for fences and hidden in the bottom is a bag of cranberry apple tea for that yummy "apple" smell! And then I made a fall box, or as we call it, our Hedgehog box. Beans, silk leaves, wooden branch slices, wooden apples, wooden acorns, mushrooms, pine cones, pom poms (I am on a pompom kick!!) moss, scoops, cups for making fall beverages, wooden hedgies and hidden in the bottom is a bag of Chai tea for a nice smell. Opening this box smells divine!

I also made some Montessori inspired trays of activities. My real hope and desire was to come up with things to keep Isabel busy while I work on reading with Anastasia.


Marble spooning (the leaf dishes were in the dollar section at Michael's).

Pompom sorting with little tongs.

Counting leaves (this is a bit advanced for them right now).

Sticking with the "H" theme we read Hedgie's Surprise by Jann Brett and made Hedgehog cookies as our baking activity. I love the Waldorf concept of daily and weekly rhythm so Monday is our baking day. We sang Happy songs and did the Hokey Pokey and played Hide and Seek.

Oh, and can you believe how big and handsome this little man is? I can't stand how cute he is. He is such a perfect, happy, cuddly baby. He is the kind of baby that makes people want lots of babies. Only I know what other genes are in our pool... and that scares me. hahaha.

Thursday, September 3, 2009

Easy-Peasy Light and Breezy Blanket Tutorial

For Bridget: and anyone else: this is my very first tutorial, so please be patient. I made a smaller version of my picnic blanket the other day. It is supposed to be an activity mat for doing school work on the floor. I figured I would take some pictures and *try* and explain the project for anyone wanting to make one. There are 2 things that are very important to making this: 1. You must be able to sew a straight line (as the patchwork probably won't work otherwise) and 2. you must be able to safely iron: enjoying ironing is an excellent bonus and will take you far in the quilting world. ;)


Materials:


Fabric for patchwork on top. I used 3 yards of 1/4 yard squares for my picnic quilt, and scraps totalling around 1 1/4 yard for the activity mat.


Old or thrifted sheet for bottom


Scissors, Needle, thread and sewing machine


Step 1: Cut your fabric into desired size squares. I cut 12- 1/4 yard squares for my picnic blanket and I cut scraps into 3 columns of the same width for this smaller mat. Then lay your sheet down, and lay your squares on top in the order you wish to sew them. This will give you a rough idea of how it will look.

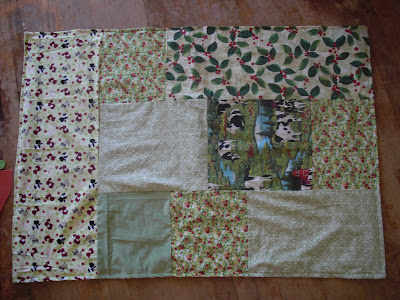
Step 2: Sew the columns (or rows if you desire) of squares together as straight as possible. I didn't pin them, but I am brave like that. So pin the squares together if it helps. ;)


Step 3: Iron the columns. Line them up (as in picture above). If you have same-sized squares it is important to line up the squares in the middle of the column. Once you have them where you like, place one column on top of the other RIGHT SIDES TOGETHER. That means, make sure the backs of the fabric are facing out. And pin them together starting in the middle and working your way down. I pinned the first two columns, sewed them together and then pinned the last column in the same manner (starting from the middle with right sides together) and sewed it.


Step 4: Iron the entire patchwork- right side up.


Step 5: Lay the patchwork on top of sheet (iron sheet if necessary) RIGHT SIDES TOGETHER and start pinning!! I pinned about every 4-5 inches, starting at the top of the quilt, working around the edges and through the middle. Pin in between the squares, and on the squares... pin everywhere!!! I know it is a pain, but this will keep the patchwork and the sheet even and together while you sew.


Step 6: Sew around the outside of the entire quilt, LEAVING A 5 inch OPENING along one edge of the quilt for turning right-side out. Remove the pins that you placed along the edge as you go.


Step 7: Remove all pins (I forgot this step and it was very pokey!!!)


Step 8: Pull entire quilt through your 5 inch opening.


Step 9: Sew along the outside of the entire quilt, starting at the opening you left. Feel free to iron it flat before doing so, as it will probably make it easier. Don't worry too much if it isn't perfect... NO ONE WILL NOTICE. Unless of course, they have no life. And it should look something like this:

Or this:

Step 10: Go have a picnic!!! :)