Showing posts with label sewing. Show all posts

Monday, August 6, 2012

Finished Projects

Once upon a time, Little Red Riding hood took a walk into the forest...

There is a great sense of accomplishment that follows a completed sewing project. Especially one that was ordered nearly 3 weeks ago. Unlike housework which is only accomplished for mere moments before someone tracks mud in on their feet, dirties a dish or decides to change for the 16th time that day because apple juice spilled on their dress. For one reason or another, I ended up with several custom clothing orders all at once.  My sanguine temperament took over and had, as always, an overly optimistic outlook on how quickly and easily I could finish these projects.  This little red riding hood "caplet" and ruffled skirt (with little red fabric) is for a cute little girl on her 2nd birthday.  It is terribly small looking on Isabel, but the measurements are as ordered, so my fingers are crossed that they will be well received.

 Its always a little scary for me, sending a piece of my work out into the world, to a new home. Thus far I haven't had an unhappy customer. Lets hope there is never a first! In the midst of orders and our anniversary, we were invited to a "Pirate Party" for our little friend Elan, who is my childhood friend Tara's little boy. 
 We found the cutest paintable ship at Hobby Lobby and I made some little pirates for the birthday boy.  The girls had the time of their life with a kiddie pool and sand and a treasure hunt! What fun.
And 3 weeks ago I made the above dress for a friend of mine. She has 3 little girls, and I have 3 more dresses to work on now that all of my Etsy orders are FINALLY caught up.  No thanks to coming down with Strep throat last weekend. I am thankful though, that my children didn't catch it, thanks to an immediate dose of antibiotics. Love 'em or hate 'em, antibiotics save lives, and entire families from misery!  Whew. So it had definitely been a bit crazy over here. Last week Nick sold the Jeep and we are down to one car until his truck is up and running. Also, I have kept the kids inside all week long in case they were contagious, so they are all a little stir crazy!  Establishing a bit of rhythm and beginning our life-long adventure in learning has been a beautiful necessity as summer fades quickly into fall.

Tuesday, February 9, 2010

Barn Makeover

Anastasia likes her little wooden barn she received for her birthday, but as you can see, it was a little bland. Snowed in day 3, Sunday, produced a little "sprucing up" of the barnyard.
I actually made 2 little play mats, the second one might go in my shop when I finish up! My favorite part is the vegetable garden with removable felt veggies: Onions, carrots and lettuce!! Oh my. I think making them out of sculpey clay would be a little nicer so that is next on the agenda. If I ever get out of the house to the craft store that is. 3 feet of snow now, and 10-20 inches on the way! Oy.

The haybales were quite simple and cute and the animals won't go hungry! And the ducks now have somewhere to swim:Anastasia was so excited about her new "farm" and all of her animals and fairies love swimming in the pond. It took me all day, but I know it will provide many hours and days of pretend play for the little ones.As you can see, I made little hay beds for the interior by cutting up some yellow-orangish felt that has been sitting in my stash for a couple years. REALLY. I am really into this play scene thing and want to learn wet, and needle felting now. Really. Badly. This pumpkin house set just kills me with its cuteness! Ack! I am also smitten for THIS hand-knit farm on Etsy. I just love Etsy. If I can't make it, I will buy it on Etsy. That is my new theme.

Sunday, January 24, 2010

Weekend WIP

Its been a busy weekend with Nick's dad in town but I managed to whip up a couple little things in stolen moments here and there. I made 5 fairies (4 are currently waiting on wings) for Anastasia's birthday gift and cake toppers and a little mushroom card holder for my Little Red Whimsy cards:
I was inspired by the Wee Folk Art card holders, but their pattern wasn't big enough for my cards. Weird. So I made my own with their's as inspiration. I am not sure if I mentioned it or not, but I purchased my logo, banner and clipart from Alluring Effects: $10 for everything. I am just not computer savvy, nor do I have a decent program for designing (although I am learning to make do with Paint... lol) so I am happy others do such a nice job.
Well, I have more to finish for the party and can't wait to share all of the ideas that are unfolding and coming together for my Anabear's special day. I will keep you posted! ;)

Friday, January 15, 2010

Fairy Cute

I finally put the concept of peg fairies into action!! This has been a week in progress between making, selling, and shipping sets of gnomes. I think they are ADORABLE and I love them and I am making a set for Anastasia for her birthday too! The fairies will look so sweet on her cake with some mushrooms... don't you think?
A trip to Michaels gave me what I needed to make some mushroom table and chairs.

And leaf beds!!! This is my FAVORITE part. I had them in my mind and finally made them the other day! They are way cuter in real-life!


I made a cute bag, but I really need to come up with a better way to store them. It is really cute and makes a little home, but the pouch took more time and work than I am willing to put into something that I can't really market for too much money.... back to the drawing board I guess. But everything folds up so nice:


So I am SOOOOO EXCITED about this. Hopefully it will inspire you to make one for all your kids.... or buy one... from my shop :) Happy Friday! Pizza for us tonight! yum.

Thursday, September 3, 2009

Easy-Peasy Light and Breezy Blanket Tutorial

For Bridget: and anyone else: this is my very first tutorial, so please be patient. I made a smaller version of my picnic blanket the other day. It is supposed to be an activity mat for doing school work on the floor. I figured I would take some pictures and *try* and explain the project for anyone wanting to make one. There are 2 things that are very important to making this: 1. You must be able to sew a straight line (as the patchwork probably won't work otherwise) and 2. you must be able to safely iron: enjoying ironing is an excellent bonus and will take you far in the quilting world. ;)


Materials:


Fabric for patchwork on top. I used 3 yards of 1/4 yard squares for my picnic quilt, and scraps totalling around 1 1/4 yard for the activity mat.


Old or thrifted sheet for bottom


Scissors, Needle, thread and sewing machine


Step 1: Cut your fabric into desired size squares. I cut 12- 1/4 yard squares for my picnic blanket and I cut scraps into 3 columns of the same width for this smaller mat. Then lay your sheet down, and lay your squares on top in the order you wish to sew them. This will give you a rough idea of how it will look.

Step 2: Sew the columns (or rows if you desire) of squares together as straight as possible. I didn't pin them, but I am brave like that. So pin the squares together if it helps. ;)


Step 3: Iron the columns. Line them up (as in picture above). If you have same-sized squares it is important to line up the squares in the middle of the column. Once you have them where you like, place one column on top of the other RIGHT SIDES TOGETHER. That means, make sure the backs of the fabric are facing out. And pin them together starting in the middle and working your way down. I pinned the first two columns, sewed them together and then pinned the last column in the same manner (starting from the middle with right sides together) and sewed it.


Step 4: Iron the entire patchwork- right side up.


Step 5: Lay the patchwork on top of sheet (iron sheet if necessary) RIGHT SIDES TOGETHER and start pinning!! I pinned about every 4-5 inches, starting at the top of the quilt, working around the edges and through the middle. Pin in between the squares, and on the squares... pin everywhere!!! I know it is a pain, but this will keep the patchwork and the sheet even and together while you sew.


Step 6: Sew around the outside of the entire quilt, LEAVING A 5 inch OPENING along one edge of the quilt for turning right-side out. Remove the pins that you placed along the edge as you go.


Step 7: Remove all pins (I forgot this step and it was very pokey!!!)


Step 8: Pull entire quilt through your 5 inch opening.


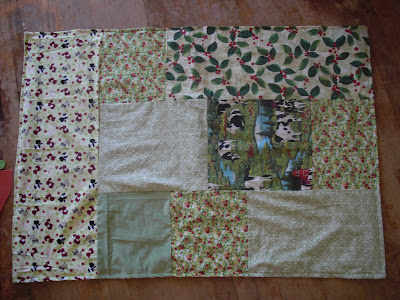
Step 9: Sew along the outside of the entire quilt, starting at the opening you left. Feel free to iron it flat before doing so, as it will probably make it easier. Don't worry too much if it isn't perfect... NO ONE WILL NOTICE. Unless of course, they have no life. And it should look something like this:

Or this:

Step 10: Go have a picnic!!! :)


Wednesday, September 24, 2008

Car Seat Cuteness!

This is what I did yesterday:
It took all day but I have wanted car seat covers that are easy to remove and clean. If anyone has a baby who spits up a lot or a toddler who eats in the car, you know how nasty car seat covers get! And you also know what a pain in the but it is to take the original covers off. I basically have to take apart the whole car seat to get the darn thing off! So now I made a little slip cover that velcro's around the straps so it comes on and off pretty easily. Our infant seat had a bit of mildew which cleaned mostly off but left some nasty stains... so all problems solved! I was so happy to find more of this Apple and Pear fabric by Alexander Henry at the Joann's in Fairfax last week!

And because Anastasia believes all photo sessions should revolve around her I took this picture too. I put the little apple and pear appliques on her shirt and picked up the matching 70's looking flower pants at goodwill for $1. So the entire set up cost less than $2! And it matches her new car seat cover! Can't beat that.

No baby yet but I don't think she will take too much longer. *crosses fingers* I have a Dr. appointment tomorrow so we will see if there is any new developments in the pregnancy saga.

Thursday, August 28, 2008

Craft Crazy

So this week I taught Anastasia how to wash her hands. She is too small to reach the sink so I made her this little tray that I set on my milk maid stool:


I pour the water from the pitcher to the bowl (eventually I will let her do it) and then she washes her hands. Then we have a small chunk of soap in the little bucket that she rubs between her hands and we rinse again. Then we dry with the little towel (washcloth) and she gets a little dab of Burt's Bees baby lotion in a bottle cap (otherwise there would be lotion everywhere.) She loves the lotion part. I have already used this set-up to tame tantrums. As she gets overloaded I ask her if she wants to wash her hands. I also set up another tray with tissue for wiping her nose, a toothbrush, hairbrush, a wet wipe for washing her face and a towel to dry. It was great because she loves brushing her teeth so I could brush her hair while she was brushing her teeth. Here she is with the cap-full of lotion in her little autumn attire:
I also found last night that if I set up her activities the night before while I am WIDE AWAKE, we are more likely to actually do the things in the morning. So today we did lots of activities from lentil-pouring to painting. We also have a new friend that I call Ruby. She is a hummingbird that frequents our window-hummingbird feeder. She is seriously there like every 5-15 minutes. Today she chased away a chickadee who stopped on a nearby tree to check out the feeder. It was funny watching this tiny bird with an attitude chase away a cute and curious 3x her size bird.

I have been sewing like mad again... and loving it. My mom bought me a bland Moses Basket (at my request) from the Consignment shop.


Here is what I did with it:

I am so in love with this apple and pear fabric that I have seen online quite a bit. I found it at Joann's a couple weeks ago and only bought a half-a-yard since I didn't have a vision for it. WELL I then was inspired to use it for the baby's basket and wished I had purchased even more!!! AH! How appropriate being that we have 2 pear and 3 apple trees and they are autumn fruits like our autumn arrival. I have dozens of ideas for making appliqued items from some of the scraps of material... I know I am crazy. Now hopefully #2 will actually sleep in this thing. A lady from the farmer's market said she would save me a lamb skin (poor lambs) to put in the bottom. Another lady is selling me an entire sheep's fleece for my crafting endeavors (like learning how to wet and needle felt). I don't know how much a fleece is... but I am a little concerned... especially because I have to clean it and then dry it...
I recently tested out a doll pattern for fellow blogger JoEbi and will be uploading pictures of it soon. It was for a cute little mermaid and she turned out lovely. I love all the Montessori and creative activities she does with her little boy in Japan. Then I got picked to test-drive a future WeeWonderful's pattern... the same designer (Hillary Lang) who I made Olive from. I love all the WeeWonderful dolls and items... so I feel so privileged to get to help out... and I get ANOTHER cute doll for me... I mean, Anastasia to play with.
So back to life.... I have dishes from our not so great enchilada dinner (that none of us ate). The only thing worse than cleaning up after a meal, is cleaning up after a gross meal that nobody would eat.

Monday, August 25, 2008

5 weeks or so....

I am getting to that point where I think a little someone inside of me is sucking all my energy up. I remember the last month or so with Anastasia feeling this way, and I can honestly say I am ready not to be pregnant anymore. Am I ready for another little baby? Is there truly such a thing as being completely ready for an entirely new life entering and turning your life upside down? I don't think it is possible. Its one of those things you just have to go with the flow until everything falls into place I guess.

I haven't had time for sewing in the past few days. I feel like I am constantly busy, and don't actually get anything done. There are two reasons for this.

1. I haven't been sleeping well (except last night) because I have been laying down WIDE AWAKE. So I spend my mornings like a zombie until about noon, and by that time I have to spend the rest of the day cleaning up the mess that my daughter created while I was in my stupor.

2. Anastasia has been teething and has been a total grump. Then I get grumpy and by 2pm we are both ready for a nap.

Then Nick gets home, and we are all happy. I try to make up for lost time and use my energy to get everything done in the evenings. Then I think I can't wind down enough to sleep until 1 or 2 or 3 am. And if Anastasia wakes up (when she wakes up I should say) I can't always fall back asleep for hours. So that is why I am like a mouse in one of those wheels that runs and runs and gets nowhere. Thankfully I don't have TOO much longer to go, and with my brother coming to town and Wendy visiting, I have plenty of pleasant destractions to look forward too!

I spent the weekend cleaning the deck, and Nick helped me put up a clothesline (inspired by our recent electric bill). So now my clothes smell sun-fresh, and I have added yet another chore to my list. :) Its all worth it though, I have successfully dried 3 loads in the sun, and feel like we are enjoying our yard more.

Our dog has still been acting bizarre. Hopefully she will be "normal" again after baby #2 arrives.

The bathroom is still in the works but Nick finished ALL the plumbing. Yay! So I have a sink, and even a mirror in there now.

I have been sorting through TONS of baby clothes to try and organize things. I thought one girl had lots of accessories... but having two is seriously out of control. lol.

Well I had best go help settle Anastasia down to bed seeing as it is 10:30 pm.