Showing posts with label toddler crafts. Show all posts

Tuesday, August 7, 2012

Kool Aid Dyed Playsilks

 My children love playsilks. We have had a few over the years, and it came to my attention that we were down to a single, ratty, faded yellow play silk. The sad looking silk had been a cape, a doll sling, a blanket, a net, a tent, a skirt, and so many other things in its dear little life.  It has been a while since I went playsilk shopping, or dying, so finding the price of $14 (or more) plus shipping per silk was more than I could afford.

In steps Pinterest and every one's favorite childhood beverage: KoolAid. I found this blog post with an amazing color chart for dying silks with KoolAid.  I did all the dying in the microwave, in ziplock bags, thanks to a tip from my friend Regina.  Basically that means no mess.  Basically pour 1 cup of water, 1/2 cup of vinegar, 3-4 packs of KoolAid into a ziplock freezer bag and heat for 3 minutes, let sit for 3 minutes and rinse. Then hang to dry (or throw in the dryer for 5 minutes if your children are begging for them). THATS IT! :)

I think the colors are so beautiful and vibrant.  You can make a forest green, dark blue, maroon red, and clayish orange by adding 1/2 packet of grape koolaid to 3 packs of the solid color. It makes them a little darker. Also, if you do yellow, do like 5 packs and let it sit for as long as you can stand. I love the bright, summery colors and you have to know the kids have been playing non-stop with them.  The rainbow silk I made (above) was done by tieing off sections with rubber bands in ziplock bags. I actually may re-do some of the colors that needed to be more saturated.  You can also do this on the stove which I intend to try with the hope of getting some more saturated yellow, green, blue and orange.  It was really hard with the zip locks to tie it off and make sure the silk was completely in the water... if that makes any sense at all!
I bought the silks from dharma trading post for $5.35 each I think. Even with shipping and KoolAid they were still around $6 total.  Much better than $14. I must have purchased 50 packs of Kool Aid in all the primary colors! I went several places and Wal-Mart had the best selection. They had all the colors I needed and then some! I didn't have enough silk left to make some pink.  Maybe for Christmas?
We have been really into Mermaids lately, and the silks have really added a lot of color to our Mermaid world!  :)
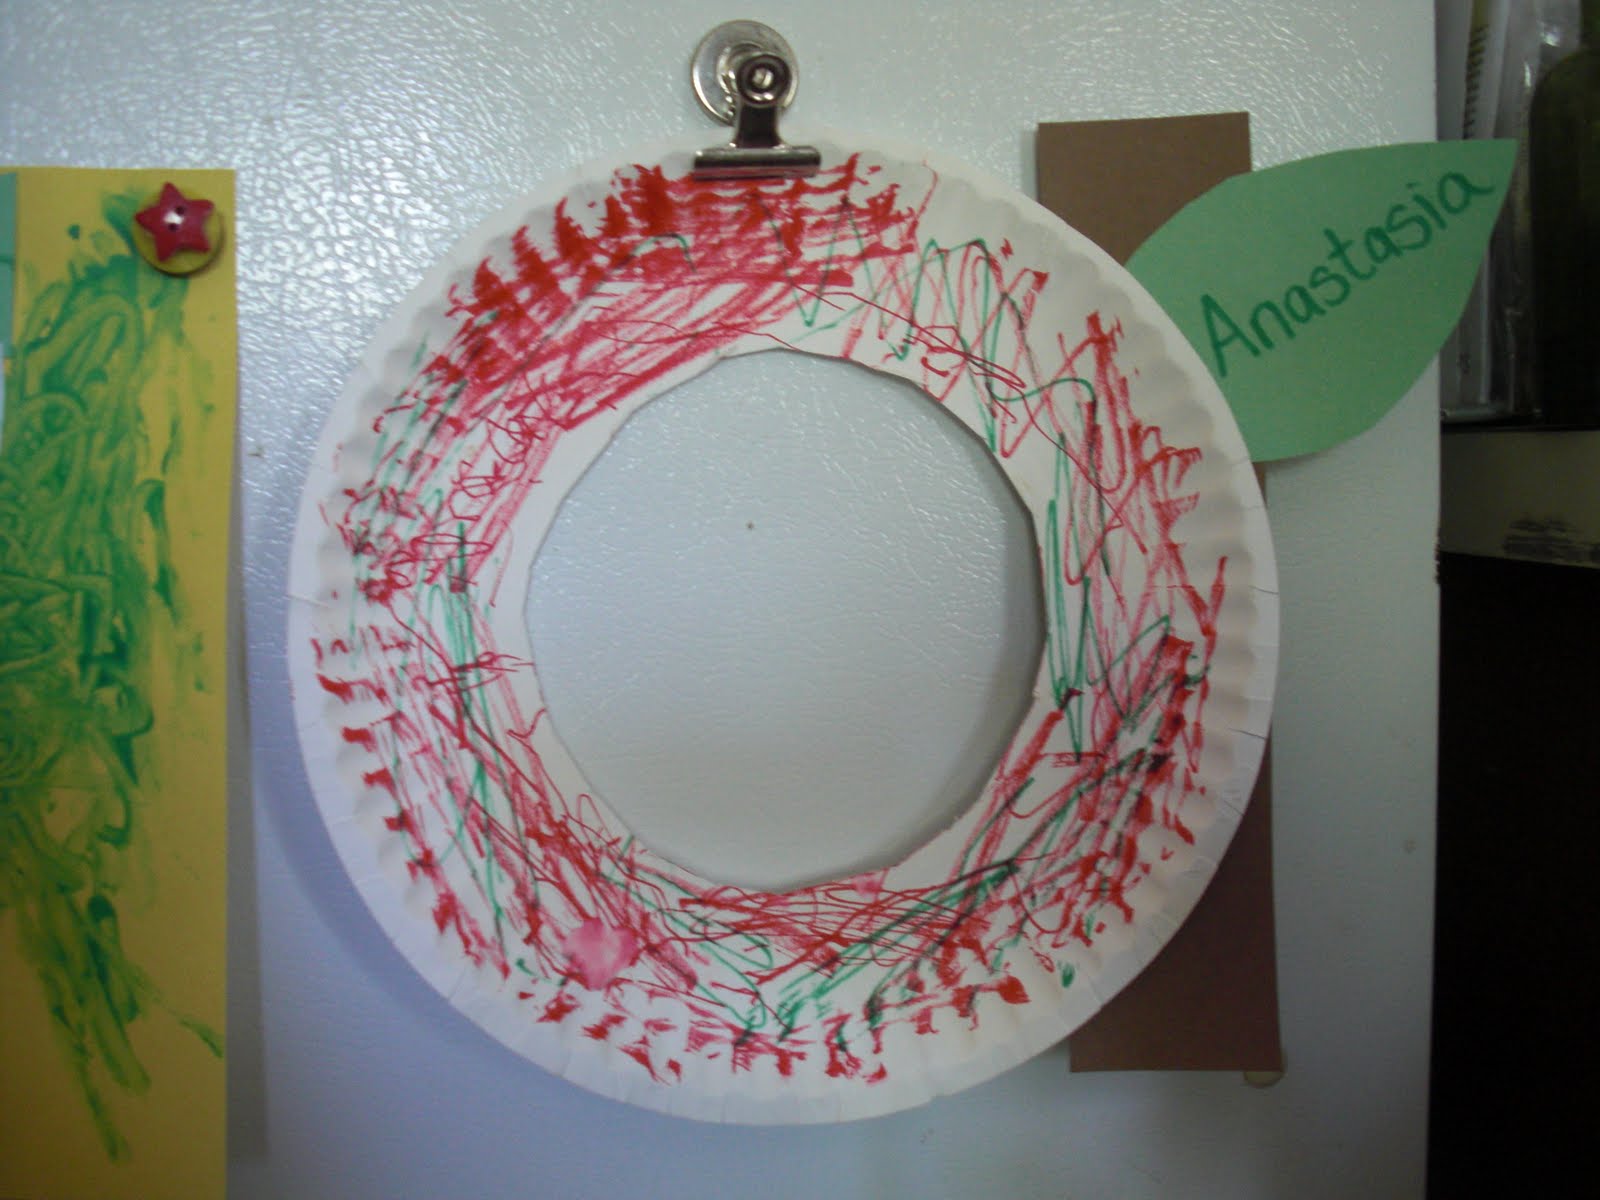
Can you guess who Anastasia is pretending to be?  I really enjoyed this project because it was quick, easy and super rewarding.  All the Kool Aid brought me back to my own sugar-induced childhood.  I think I drank gallons of that stuff.  The scary thing is, my hands are still green and blue from yesterday's dying adventure. All I can think is what all that color does to one's insides?? Yikes! I am so glad I can pass on the beauty of Kool Aid to my children in another way. :) hehe.

Now go buy some silk and add some color and creativity to your life!

Wednesday, April 28, 2010

A is for...

Alligator (who happens to be eating pasta) and apple
(both crafts from No Time For Flashcards) and our "A" lunch:

Apples, almonds, apricots (dried), apple-peanut butter sandwhiches and animal crackers. No one liked my yummy sandwhiches, but the rest was a hit... I cut the almonds and apricots into small pieces for Anastasia. I also made flocked letters:


They are a little wonky, but they are for Anastasia to teach Isabel the letter sounds, and how to draw the letters. They are my homemade take on Montessori Sandpaper letters which you can buy on Etsy here. I am just too cheap to buy them right now... I would rather spend my money on toys, fabric and books... and other fun things. There is also the space issue... we don't have room for any more "stuff" no matter how educational it might be! haha. I plan on buying a little box for the flocked letters, and perhaps little phonics bags with small objects in them. :)
I spent the weekend in a very, exhausted state... it was quite depressing really. I am feeling much better now... and we finished up our "A" activities on Monday, which ended with a baking of Apple Crisp with ice cream! We also did some pages in an alphabet sticker book, we watched movies about the letter "A" on Youtube from Sesame Street, and we even had an egg hunt closer to Easter (We have been stuck on A for a while) with small objects in the eggs that start with "A"! So now I am preparing for "B" with some handmade bears and Goldilocks.... hopefully I can finish the set today! It is nice to be out of the fog... but there is so much I left undone that needs doing! But right now naptime for all sounds like a pretty good idea! Happy Wednesday!

Tuesday, September 23, 2008

Owl Activities

One of our favorite books is Owl Babies by Martin Wadell. Being as I think owls are one of the neatest animals ever and seem to fit the fall and halloween theme quite well, I decided this would be owl week. Anastasia likes to make the "whoo whoo" sound but often mixes it up with "moo". So first off I made these pom-pom owls lightly based off of the tutorial here. I actually used BellaDia's Pom-pom tutorial here. It was so easy and addicting. I want to make an entire pom-pom zoo! :) We used the owls as characters in the Owl Babies story. I have read it so much and even have voices for Sarah, Percy and Bill. Then I prepared this owl puppet activity:
Anastasia painted the cereal box body and I cut out all the pieces. When it dried I helped her glue it all together. Later I gave them to her to play with and she ripped off the wings. Oh well. I am thinking of turning an oatmeal container into a tree stump for the owls to live in. And lastly here is Anastasia's painting activity:
I like to leave art supplies out for her to use when she wants, but as anyone knows with a toddler, that can be VERY DANGEROUS. My friend Regina gave me this idea for keeping water colors accessable to toddlers. I used a small greeting card box and put cut-up watercolor paper, 2 cut out colors from a crayola water color set, a paintbrush and a bottle cap for water. She still has to come to me for the water so atleast I know what she is doing before she paints the walls. I also keep a sketchbook with 3-4 colored pencils out for her, and some paper with crayons readily available and sticky notes with pens ready if she wants them.

Still no baby for those of you wondering (Annie!). But I have been feeling pretty crampy today... but like everything at this point, that could probably mean ANYTHING.

Tuesday, August 12, 2008

Unplugged: Hot

I had to stretch things a little bit to come up with a toddler "hot" activity. Or maybe I just couldn't find the right inspiration... either way we had fun! I took both Anastasia and Leia for a nice walk down our street which was great with this awesome breezy autumn-feeling weather. Can August stay like this please? Then we came home and I made Anastasia her first, very-own cup of hot chocolate with a giant marshmallow and a little spoon. She seriously played with
the marshmallow and spoon for 20 minutes and insisted on drinking the hot chocolate sip-by-sip with her little spoon. Then we got out the paint and painted using warm or "HOT" colors which Anastasia loved! Up until this point we only used finger paints and watercolors so real paint was a complete treat for us to work with. OH and if you buy Crayola's "washable" tempera paint, be careful because the blue splattered on my shirt while opening and wouldn't wash out. :( If anyone has any ideas for getting it out, let me know.

Here she is painting so nicely:


And here is where she turned into Red Beard the pirate. She was ready to nap.

Then we turned our painted paper bag into a lovely stuffed fish. "The Artful Parent" has a nice tutorial here. I remember doing this as a kid! I cut and glued, and she stuffed. Then I glued the tail shut. Waiting for the glue to dry took a while so a smart thing to do would be to use staples. We had time and no stapler so this worked fine.

I also have to be honest and say that perhaps I enjoy painting as much as Anastasia. As a kid I rarely remember painting much at home and I feel I have to make up for lost time so I painted little fish and turned it into a fishing game for Anastasia by adding paper clips. She already had the pole from a fishing puzzle that is too difficult for her but one could easily be made by glueing a magnet to some yarn or string and tying to a dowel or stick. She definately enjoyed this fishing set more than the two she has, and played with it quite a bit already! Hooray for free toys!
So we had fun even though we had more of a fish theme but we are heading to the beach with my mom on Thursday so it seemed appropriate.

Monday, August 4, 2008

Unplugged: Rough

Unfortunately the internet hates me. For whatever reason I have had the hardest time posting and even connecting to the net. It works fine for Nick... but it hates me. Which is why I may not get pictures up tonight... because it is slower than molassass in January. ;) So I have been very unplugged lately... lol. Not only is the net all wacky for me, but our DVD drive (our only source of DVD action) on our laptop skips constantly about 30 minutes into a movie. So now, I could pass as rustic... but I can take a bath in my own tub with hot water and everything (as of last night) so I am atleast moving up in the world!

Anyhow, this weeks unplugged theme is "rough". On Friday Anastasia and I went for a very, very short hike (toddler and pregnant woman appropriate) to Passage Creek... a real gem less than 5 miles from our house. We stopped to feel "rough" and "smooth" things along the way including rocks and bark. I am not totally sure she got it, but thats okay. We thoroughly enjoyed a dip in the creek and throwing and skipping rocks. At home I collected some "rough" and "smooth" rocks, leaves, bark, sticks, and fabric to feel, and wrote "rough" and "smooth" on two different colored papers. Together we seperated the items. Anastasia rubbed the different things under her chin to get a better feel for them which cracked me up. She totally loved our little trip and handling the different natural objects. Some other cool ideas we may try are doing some bark rubbings, some watercolor salt paintings and making some texture cards. Check the Unplugged website for even more awesome ideas!

Monday, July 14, 2008

Treasure hunt

This week's Unplugged project theme was "stone." We decided to paint rocks with crayons as seen here. Amazingly many others participating in the Unplugged project came up with the same idea (I saw it on the Crafty Crow). Great minds think alike! Here are our "treasure stones":

Anastasia loved the initial stone hunt where we took our basket into the yard and found some light-colored stones. She really got into it! Then we took the stones in and washed them in a bowl of water with an old nail brush and a little dish soap. She spent about an hour on this task, just washing, and scrubbing the rocks. When she finished scrubbing, she put some back in the water to wash again. I think I will start her on dishes tomorrow! haha

Now the fun part, which was a little less fun for her, and really fun for me. I put the rocks on a foil-lined sheet in the oven at 350 degrees for 10 minutes. I took them out and we melted crayons on them. For Anastasia, I held the stone for her with a rag because it was too hot for her to do on her own. We are learning the word "hot" so it was actually a good activity as she could touch the stone without getting burned, but it was hot enough to make my point. She liked the crayon melting effect and we did a few together. I ended up doing most of them alone while she napped as it took a while and I had to heat them up again.


After finishing the batch, I placed them in her sand box for a 18-month old appropriate "treasure hunt." She loved it!

This is some awesome Easter Egg Hunt prep if you ask me! She should be a pro by next Spring!After melting some of the crayons I decided to pull the wrappers off and make a set of muffin-tin crayons. I melted the crayons for about 6 minutes in the oven at 350 degrees in cupcake wrappers. I then stuck them in the freezer for a while. They turned out great and looked like Reeses cups, but A. didn't quite get the idea of coloring with them and made a tower out of them instead.

Anastasia is currently carrying around her basket of treasure all around the living room. Definitely our favorite project yet!

And LOOK AT MY BEAUTIFUL BATHROOM FLOOR!!!!!!!!!!!!!!!!!!!!!!!!!:


Nick finished the grout last night, and I had my doubts prior to his "grouting" but now... I am in love. With my husband of course ;) and his floor laying abilities. Perhaps it is hard to appreciate but if you had seen the gaping chasm where one should be walking, you would totally understand. Guess what is going in now? The toilet... hopefully!! The wellspring of cursing I have been hearing worries me a bit...

Edit: After I finished my post, my toilet was in! I have to manually flush it until tomorrow probably, but beggars can't be choosers!!!

Tuesday, July 8, 2008

Unplugged: Sky

The Unplugged theme this week was sky. Being that we are going to the beach, I was thinking of skipping it and doing beach activities as we have been reading beach-themed books. Then I thought we could make a kite to fly in the sky at the beach. I found an easy kite tutorial here. But honestly, I figured a kite would be too difficult for an 18month-old to maneuver so I thought a wind sock would work... and it kind of did. :)

There are two ways to make this, and I will give you the smart way--the way I didn't do it and should have for less of a mess factor. I used a paper towel roll cut in half and cut each half down the center and taped together. Then I cut a piece of paper to wrap around it. I had Anastasia decorate it with crayons and stickers (which didn't stick well to the crayon). The smart thing to do for a toddler is find some double sided tape to stick to the back of the bottom edge of the paper. You can then cut strips of tissue paper (like me) or use crepe paper. Have the child stick the tissue paper to the tape (this is where I used glue and made a really big mess and all the strips became stuck together). Then adults or older children can glue or tape (I actually did a little bit of both for durability) the paper with the strips around the paper towel roll. Let dry if you used glue and punch holes in the top and add string. We took it outside and swirled it around (there was no wind really). Anastasia enjoyed watching me swirl it around and it was quite fun to watch!Here she is with her artwork! I don't think we will be taking this to the beach due to its fragility and how tight the Jeep will likely be packed. So I made her a ribbon wand by attaching some fabric ribbon (I found some rainbow ribbon in the gift wrap section at Target) to a wooden dowel. This could be as easy as glueing a long piece of ribbon to an unsharpened pencil or as complex as putting an eyelet in the ribbon, putting a ring through it, and attaching it via a metal loop that screws on the top of the dowel (which I did for the professional look). You can even buy a ready-made one at Target for $5. So perhaps our kites don't really fly in the "sky"... but I am sure we will see a few that do at the beach. Oh, and I had to share this neat "cloud painting" activity at School For Us. I will probably do this when we come back from the beach! I had best run my errands!!! Have a great week!